Thursday, November 21, 2013

Fall Wreath Tutorial - Burlap Wreaths

Have you seen the prices they charge for burlap wreaths in stores?! They must be crazy because I made two wreaths for under $20!

And now I am going to teach you to do the same!  So the first thing you need is a bunch of Michael's coupons... no one likes to pay full price, am I right?


I don't have my receipts any more but as I remember the two wreath hoops were about $4 each (before coupon), then the burlap rolls were $4 each(before coupon) (I only needed two!), the felt leaves and ribbon I honestly don't remember the price but I do remember that they were already on sale, so no coupon required!

I searched all over Pinterest to try and find a good way to do the burlap and I didn't really find a great tutorial.  Now you are probably expecting me to therefore give you a great tutorial on how to do it but... I can't say that I could.  What I can tell you is that all you have to do is weave the burlap ribbon in and out of the wires on the hoop.  Thats pretty much the best and only way to describe what I did.  It takes FOREVER at first because you have to pull 15 yards through each time, but it gets easier about half way through and in the end I think I did both in less than 2 hours.

After you have your burlap all poof-ed (is that a word?) and looking the way that pleases your preference, you can tie off the extra burlap that is left to make the hanger hook part.  Again, I can not think of a fabulous way to describe this process.  I just messed around with it until it looked right!  One hint though: make sure that you make the second one the same length as the first one! Otherwise your wreaths will not hang evenly.  I used a bit of hot glue to secure the ends.  Be EXTREMELY careful doing this, hot glue goes straight through the burlap so wait a few seconds before pressing anything down to avoid hot glue-ing your fingers!

Now let your imagination run wild!  If you like the way my wreaths turned out, which I really hope you do, keep reading!  Otherwise, share what embellishments you're using with me in the comments! :)

I purchased two bouquet things of leaves at Michaels, half of them were regular fake leaves and the other half were kind of a felt material.  I loved the way the felt ones looked so I only used those.  For the bows, I used about 6 yards of ribbon each!  I had never made a bow from ribbon before so yet again I don't have step by step instructions for you, sorry about that!  But if I can figure it out, so can you!  The ribbon I had had wire in the edges so that helped a lot to keep the shape of the bows.  I would suggest getting a similar ribbon if you aren't a bow expert, like me.  Just work that ribbon until it works for you!

Then I just used hot glue to get everything on there!  It helped me to lay them both out before glueing so that I had an idea of where everything would go before committing to it with the hot glue.

Finally give them to your mom as a surprise when you come home for the weekend! ;)

Thanks for reading!
Pinterest
Etsy
Facebook


Wednesday, November 13, 2013

Craft-a-holic

Here is where you can buy my crafts: Precious Prep on Etsy
I did a LOT of sewing this weekend! And let me tell you- it was awesome! I'd kind of taken a break from sewing for a bit there but it felt great to get back at it! Here are the majority of items I made:

Quite a bit right?! And that isn't all of it! Please leave a comment or shoot me an email (chicboutique612@gmail.com) if you'd be interested in any of the items pictured! I can do custom items too with my embroidary machine! 

So the real point of this post is to share some valuable lessons I learned this weekend! 
1) the iron is your friend! I never use the iron because it is a pain to get it out with the ironing board and wait for it to heat up and blah blah blah... But for once I went through with the hassle and OMG! It makes a difference! 

2) pin pin pin! I always hated the process of pinning my fabric- takes so long and then you have to pull em out as you sew and... Am I sounding lazy yet? HA! But yeah, pinning makes a huge difference! So just do it!

3) patience! As you might be able to tell from tips 1 and 2... I'm not the most patient girl on Earth ;) But if you are patient the first time, you won't have to rip everything out and try a second (third) time! And you won't have to insult your sewing machine with a dictionary's worth of 4 letter words ;D tell me I'm not the only one who does that... Oops 

Happy Crafting! :) 

If you are interested in purchasing, the items I have available are:
Makeup bag
Pencil pouch
Hair bow
Glasses sleeve
Key fob/ key chain
Prices will vary based on each order but items are between $5-$10 :)
or 

Monday, November 4, 2013

DIY Makeup Palette

I am so excited to share this with you!  I combined my two (current) favorites - makeup and crafts, to create my own palette.  If you haven't heard of "depotting" and makeup palettes, just do a quick Google, You-Tube or Pinterest search and you will be able to learn a bunch about it!

At first my plan was to make a Z-Palette copy and depot all these eyeshadows:


But then I chickened out and didn't want to risk the most expensive makeup I've ever bought with this experiment.  Soon I will write another post on depotting some cheaper eye shadows :)

So here are my supplies, in pictures, because who doesn't like a bunch of pictures??

Are you ready for this?! Washi Tape SHEETS! They're awesome (Got mine at Target)

Magnetic Tape Strips (Just $0.97 at Walmart!)


This container from the Container Store (It was $5.99) (Sorry about the bad pics, it was hard to figure out how to take a picture of something clear...)

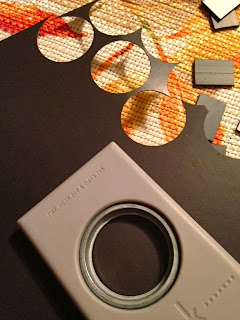
A 1" circle punch (not 100% required but it sure makes things easier!)

And now for the how-to!

First cut a piece of Washi Tape Sheet to fit into the container, like so:


Don't be fooled by the picture - that thing is no where near perfectly smooth, but it looks pretty good, took some patience to get that in there though, but you can do it!  I chose this pattern because it is super cute and since it is darker, if any makeup gets on it then it won't show up as much.

Next take the magnetic strips and make 3 equally spaced rows:


Make sure you space them out enough so that the shadows will fit with each one centered.

Now the bottom of these Lorac containers has a ridge around the edge, so just putting one magnet on the bottom didn't work.  I had to put a circle of magnet (although you could just use thick card stock instead) on each to make the bottom even and then put a strip of magnet down, like so:


The circle punch worked perfectly! This magnetic sheet was also from Walmart, by the way.

So this step is optional, but super cute and fun, if you ask me!  I decorated each container with more washi tape!  I guess you could say I like washi tape, check out THIS POST for another washi tutorial :)


Bad pic, I know, but you get the gist of it, right?

Finally just load it up with your Dazzling Dozen and enjoy!  The reason I really wanted to make something like this is because every day I had to open up the box of shadows, unscrew each color I wanted, and then close em all up and blah blah blah!  It was a real pain, so now all I have to do is flip open the lip and I'm ready to go! Yay! 


A little more about the eyeshadows, in case you're interested.  These are a limited edition eyeshadow collection I got at Ulta.  I am not sure if they are still available but I thought $35 for twelve nice shadows was not a bad deal, considering just one shadow can cost around $15!  The brand is Lorac (if you couldn't tell from the packaging! Ha!).  I've never used this brand before but I like em :)

Pleaseeeeeee leave me comments!!!
Follow me on Pinterest
Check out my Etsy shop :)


I am in no way affiliated with any company, this is just my personal stuff and my own creations!