Sunday, December 15, 2013

Makeup Brush Roll Tutorial

Today I actually had time to do some crafting!  How exciting!

Sorry I haven't posted in a while, I have been working on my new blog Deals Actually!  I hope you'll check it out soon!

My tutorial today is for a super cute makeup brush roll!  This is super quick to make (30 mins?) and would make a great last minute Christmas gift for all the lovely ladies on your list!  How cute would this look in someone's stocking on Christmas morning?

So all you need to make this is some felt, fabric, and ribbon!  So easy!

First, cut felt to 8" x 9" and 4" x 9" (super easy if you are using a sheet of felt like me!)

Wow the felt looks GREEN in that pic!  I promise it does not glow in the dark! :)

Next, sew the 2 pieces together, creating the slots for your brushes.  I left a half inch on either (for the next step) and then I have a 2" slot on each end and four 1" slots in between.

Now cut out your fabric to 9" x 8" (I didn't actually measure, I just used the felt as a template!)  You'll also need a length of ribbon.  Exactly how long?  Whatever your gut tells you ;)

Next place the fabric and the felt right sides together (the side with the slots is the right side of the felt).  Make sure you fold the ribbon in half and place the separate ends inside your fabric sandwich, leave about an inch of the loop end sticking out.  You'll want to position the ribbon parallel to the top of the slots.

Sew around the edges (make sure you only catch the ribbon on ONE side!) leaving an opening for turning near the middle bottom.  Trim away any excess and clip the corners.  Turn and top stitch the opening.  You should have something like this:

Now how quick and easy was that?!  Felt is my new best friend!  It eliminates the need for interfacing and batting, its basically the best thing ever.  And the edges never fray!  Oh so amazing! 

Fill her up with your brushes:

Roll and go!

No time to make one?  Check out my Etsy store, Precious Prep, and place an order!  I am offering free shipping for the rest of the year!  Take a look around while you're there, maybe you'll find something else you like too!


Hope you all have a Merry Christmas!
Precious Prep Now only $20!
Precious Prep Now only $15.40!

Follow me on Pinterest :)
Subscribe to my posts!


Thursday, November 21, 2013

Fall Wreath Tutorial - Burlap Wreaths

Have you seen the prices they charge for burlap wreaths in stores?! They must be crazy because I made two wreaths for under $20!

And now I am going to teach you to do the same!  So the first thing you need is a bunch of Michael's coupons... no one likes to pay full price, am I right?


I don't have my receipts any more but as I remember the two wreath hoops were about $4 each (before coupon), then the burlap rolls were $4 each(before coupon) (I only needed two!), the felt leaves and ribbon I honestly don't remember the price but I do remember that they were already on sale, so no coupon required!

I searched all over Pinterest to try and find a good way to do the burlap and I didn't really find a great tutorial.  Now you are probably expecting me to therefore give you a great tutorial on how to do it but... I can't say that I could.  What I can tell you is that all you have to do is weave the burlap ribbon in and out of the wires on the hoop.  Thats pretty much the best and only way to describe what I did.  It takes FOREVER at first because you have to pull 15 yards through each time, but it gets easier about half way through and in the end I think I did both in less than 2 hours.

After you have your burlap all poof-ed (is that a word?) and looking the way that pleases your preference, you can tie off the extra burlap that is left to make the hanger hook part.  Again, I can not think of a fabulous way to describe this process.  I just messed around with it until it looked right!  One hint though: make sure that you make the second one the same length as the first one! Otherwise your wreaths will not hang evenly.  I used a bit of hot glue to secure the ends.  Be EXTREMELY careful doing this, hot glue goes straight through the burlap so wait a few seconds before pressing anything down to avoid hot glue-ing your fingers!

Now let your imagination run wild!  If you like the way my wreaths turned out, which I really hope you do, keep reading!  Otherwise, share what embellishments you're using with me in the comments! :)

I purchased two bouquet things of leaves at Michaels, half of them were regular fake leaves and the other half were kind of a felt material.  I loved the way the felt ones looked so I only used those.  For the bows, I used about 6 yards of ribbon each!  I had never made a bow from ribbon before so yet again I don't have step by step instructions for you, sorry about that!  But if I can figure it out, so can you!  The ribbon I had had wire in the edges so that helped a lot to keep the shape of the bows.  I would suggest getting a similar ribbon if you aren't a bow expert, like me.  Just work that ribbon until it works for you!

Then I just used hot glue to get everything on there!  It helped me to lay them both out before glueing so that I had an idea of where everything would go before committing to it with the hot glue.

Finally give them to your mom as a surprise when you come home for the weekend! ;)

Thanks for reading!
Pinterest
Etsy
Facebook


Wednesday, November 13, 2013

Craft-a-holic

Here is where you can buy my crafts: Precious Prep on Etsy
I did a LOT of sewing this weekend! And let me tell you- it was awesome! I'd kind of taken a break from sewing for a bit there but it felt great to get back at it! Here are the majority of items I made:

Quite a bit right?! And that isn't all of it! Please leave a comment or shoot me an email (chicboutique612@gmail.com) if you'd be interested in any of the items pictured! I can do custom items too with my embroidary machine! 

So the real point of this post is to share some valuable lessons I learned this weekend! 
1) the iron is your friend! I never use the iron because it is a pain to get it out with the ironing board and wait for it to heat up and blah blah blah... But for once I went through with the hassle and OMG! It makes a difference! 

2) pin pin pin! I always hated the process of pinning my fabric- takes so long and then you have to pull em out as you sew and... Am I sounding lazy yet? HA! But yeah, pinning makes a huge difference! So just do it!

3) patience! As you might be able to tell from tips 1 and 2... I'm not the most patient girl on Earth ;) But if you are patient the first time, you won't have to rip everything out and try a second (third) time! And you won't have to insult your sewing machine with a dictionary's worth of 4 letter words ;D tell me I'm not the only one who does that... Oops 

Happy Crafting! :) 

If you are interested in purchasing, the items I have available are:
Makeup bag
Pencil pouch
Hair bow
Glasses sleeve
Key fob/ key chain
Prices will vary based on each order but items are between $5-$10 :)
or 

Monday, November 4, 2013

DIY Makeup Palette

I am so excited to share this with you!  I combined my two (current) favorites - makeup and crafts, to create my own palette.  If you haven't heard of "depotting" and makeup palettes, just do a quick Google, You-Tube or Pinterest search and you will be able to learn a bunch about it!

At first my plan was to make a Z-Palette copy and depot all these eyeshadows:


But then I chickened out and didn't want to risk the most expensive makeup I've ever bought with this experiment.  Soon I will write another post on depotting some cheaper eye shadows :)

So here are my supplies, in pictures, because who doesn't like a bunch of pictures??

Are you ready for this?! Washi Tape SHEETS! They're awesome (Got mine at Target)

Magnetic Tape Strips (Just $0.97 at Walmart!)


This container from the Container Store (It was $5.99) (Sorry about the bad pics, it was hard to figure out how to take a picture of something clear...)

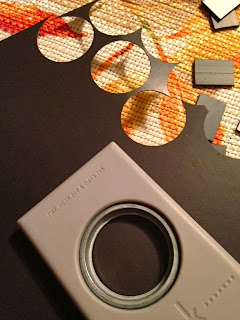
A 1" circle punch (not 100% required but it sure makes things easier!)

And now for the how-to!

First cut a piece of Washi Tape Sheet to fit into the container, like so:


Don't be fooled by the picture - that thing is no where near perfectly smooth, but it looks pretty good, took some patience to get that in there though, but you can do it!  I chose this pattern because it is super cute and since it is darker, if any makeup gets on it then it won't show up as much.

Next take the magnetic strips and make 3 equally spaced rows:


Make sure you space them out enough so that the shadows will fit with each one centered.

Now the bottom of these Lorac containers has a ridge around the edge, so just putting one magnet on the bottom didn't work.  I had to put a circle of magnet (although you could just use thick card stock instead) on each to make the bottom even and then put a strip of magnet down, like so:


The circle punch worked perfectly! This magnetic sheet was also from Walmart, by the way.

So this step is optional, but super cute and fun, if you ask me!  I decorated each container with more washi tape!  I guess you could say I like washi tape, check out THIS POST for another washi tutorial :)


Bad pic, I know, but you get the gist of it, right?

Finally just load it up with your Dazzling Dozen and enjoy!  The reason I really wanted to make something like this is because every day I had to open up the box of shadows, unscrew each color I wanted, and then close em all up and blah blah blah!  It was a real pain, so now all I have to do is flip open the lip and I'm ready to go! Yay! 


A little more about the eyeshadows, in case you're interested.  These are a limited edition eyeshadow collection I got at Ulta.  I am not sure if they are still available but I thought $35 for twelve nice shadows was not a bad deal, considering just one shadow can cost around $15!  The brand is Lorac (if you couldn't tell from the packaging! Ha!).  I've never used this brand before but I like em :)

Pleaseeeeeee leave me comments!!!
Follow me on Pinterest
Check out my Etsy shop :)


I am in no way affiliated with any company, this is just my personal stuff and my own creations!


Wednesday, October 2, 2013

Littles!

No I'm not in a sorority, I'm on a dance team!  And we have bigs and littles.  This is my first time as a big and it is very fun!  I LOVE making things for people and giving it to them!  It is so much better than getting a gift to me.

I made several gifts as well as bought a few, but I am just going to cover the ones I made on here.
So I didn't intend to necessarily write a post about this so don't hold my pictures against me :)


This was the first gift they received (the dance group is called Extreme, fyi). I picked the colors based on what my littles said their favorite colors were.


These were the gift bags that I had for them, I got them from Michael's! Super cute colors and patterns.


These are their final gifts! Each one will get a shirt and hanging plaque.  I rolled up the shirts so that they would be a surprise and tied 'em up with pretty bows.  Note how the colors of the letters match the chevron frames :)

Here is another picture of the plaques. These were really fun, easy, and cheap to make!  I got the plaques ($0.97 ea), letters ($1.77 ea), and ribbon ($1) from Walmart.  I painted them and Mod Podged a piece of scrapbook paper on, then hot glued ribbon for a hanger.  I added the bow as a last minute decision and I'm so happy I did!  What do you think?

Here are some really bad pics of the shirts I made!  The pics don't do them justice, I tell you!  I embroidered the white letters onto the black fabric and then sewed the squares on using a zig-zag stitch.

For the front I embroidered their initials onto the same black fabric and created a pocket!  They turned out so cute I think!

What have you made for your littles?


Monday, September 23, 2013

DIY Nautical Cork Boards

It seems like the world is obsessed with nautical things lately and I am no exception.  Anchors, sails, and whales and let's not even begin to talk about navy blue and white stripped anything!  Something about these images and color schemes is so appealing to me and makes me happy :)

So of course when it came time to move back to school I wanted to bring the nautical with me to brighten my days!

I saw an idea on Pinterest (where else?) using little cork boards from IKEA and since I am lucky enough to live right by an IKEA I popped in one weekend and grabbed myself a 3-pack!

The Pinterest idea, you may have seen it before, its pretty popular, is to cover these cork board circles with fabric.  I however did not have any nautical fabric (tragedy!) so I resorted to another solution.

Paint!  I don't know what is wrong with me but I am in a painting phase lately.  It is really fun!

On to the tutorial! Yay!

Here is what you need to look for in IKEA:

Even if you don't have much time you can go in and get some, they are right by the registers (at least in my store) so you can just go in the exit to avoid an hour long maze!


Next you need to go online and find some nautical images.  Try to choose relatively simple ones, unless of course you are an expert cutter and painter :)

I just searched google for nautical shapes and copied and pasted the ones I liked into Microsoft Word.  If you can't find an image of just an anchor or just a sailboat, just copy and paste the whole image and then use the crop feature to select the area with your favorite image.  I then made the image bigger and printed in gray scale.

The next step is to cut them each out, very carefully.  This takes a while and isn't that fun, especially when you get to the middle of the wheel (I used an exact-o knife - be careful with those things!).

Here are my cutouts on my cork-boards.  So the next step is to outline the images onto the cork.  I forgot to take a picture after I completed that step (sorry about that!) but basically when you outline them you will create a slight indent into the cork with the pen which will help you keep the paint in check later.

So after quite a bit of tedious painting, here is my finished product:

What do you think?? I love them!  Leave me a comment with any questions or just to say hi!
Thanks so much for reading by blog :)
Follow me on Pinterest!


Thursday, August 29, 2013

Get new features added to Pinterest!


Have you ever been on Pinterest and thought "Oh I wish they had a feature where..."? Well I have and I've just discovered a way to tell Pinterest about your heart's desires!

Go to the help page on Pinterest:


Search for your idea: (my current wish is to have "sub boards", more on that in a second)


Click on the search result of your choosing:


Read the description to make sure its what you want and click Me Too!:


Confirm your vote gets counted:


It really is that easy and I had no idea they had this feature!  This makes me love Pinterest even more (if that's possible) as a company because this shows they care about their customers and want to make the site what WE want!  So awesome!

So anyways if you want to skip the above steps, go to this link:
https://en.help.pinterest.com/entries/21918998-Sub-boards

I really really REALLY want Pinterest to have sub boards.  This feature would mean being able to categorize your pins within your boards.

For example, I have a board for cards - if there were sub boards I could have Christmas, Halloween, Birthday, etc. boards within the cards board.

If I were creating the feature myself (and how I assume they would too) you would click on your, for this example, cards board and that would bring you to a page with more boards (the Christmas, Halloween, Birthday, etc. boards).

Simillarly if you were going to Pin something you would select cards board and then have the option to pick which sub board it would go into.

So if you, like me, would LOVE this feature, go to this link:
https://en.help.pinterest.com/entries/21918998-Sub-boards
And click Me Too! to vote.

Just think of the possibilities!


Keep calm and Pin On graphic from: www.empowernetwork.com
All screen shots and Pinterest logo from: Pinterest.com

Thursday, August 22, 2013

Dollar Tree Storage Solutions

As promised, here is another post about my latest and greatest storage solutions.  Did I mention they are also affordable?? Here are a few ideas using items found at the dollar tree!


First up we have my Washi Tape Dispenser!


I forgot to take a before picture of the basket but it was just that, a basket (you can get the gist of it from the final product).  Below are a bunch of sticks that I think are supposed to go into a large vase or something like that but I just needed one of them to act as a dowel.  I figured a skinny dowel and the gas to get somewhere that sold one was probably more than $1 so I just bought these:

They're about 3ft long so I imagine I'll be able to find a use for the rest of them eventually :)

So I cut one of the sticks into two pieces that were the length of my basket.  Next, I put each stick through one of the holes on the end of the basket.  Then I loaded all of my washi tape onto them, making sure it would roll the right way, depending on which side I placed it.  Finally I pulled the other end of the stick through the opposite hole and hot glued a bead onto each end to prevent the sticks from falling out.  And there you have it!


Much better than a ziploc bag, no?  Here are a few more shots of it:


Now for the pill box organizer!

I wanted to get one of those trays that has a bunch of little square compartments in it, usually for make-up or tools or something.  But these are usually not very cheap so while I was at the dollar tree I found a better solution: pill boxes!
Please ignore the clothespins for now, more to come on them in the future! ;)

So these were, of course, $1 each! Can't beat it! And I liked them because each compartment is a pretty good size.  They had others available but they were too small.

I needed storage for these little 3D sticker/gem things that I have, and this fit the bill!

It is hard to tell from the picture but I was able to sort my gems; I have keys, birthday candles and hats, presents, graduation caps, bride and groom, so on and so forth.  It worked out perfectly with lucky number 7 compartments.  Now yes this was a great storage solution but, not too attractive for my craft room.  So I used my decorative duck tape to jazz things up a bit:


Not too shabby now!  Tell me your great storage ideas and check out more of mine here! :)
I really love comments!


Update:

I used the second pill box to store buttons! Again it works out perfectly and I decorated that one with pink tape! (Sorry, no pictures :/ )