Showing posts with label related post. Show all posts

Monday, April 21, 2014

Key Chain Wristlet Tutorial

Update:
Embroidered key chains now available! Click here

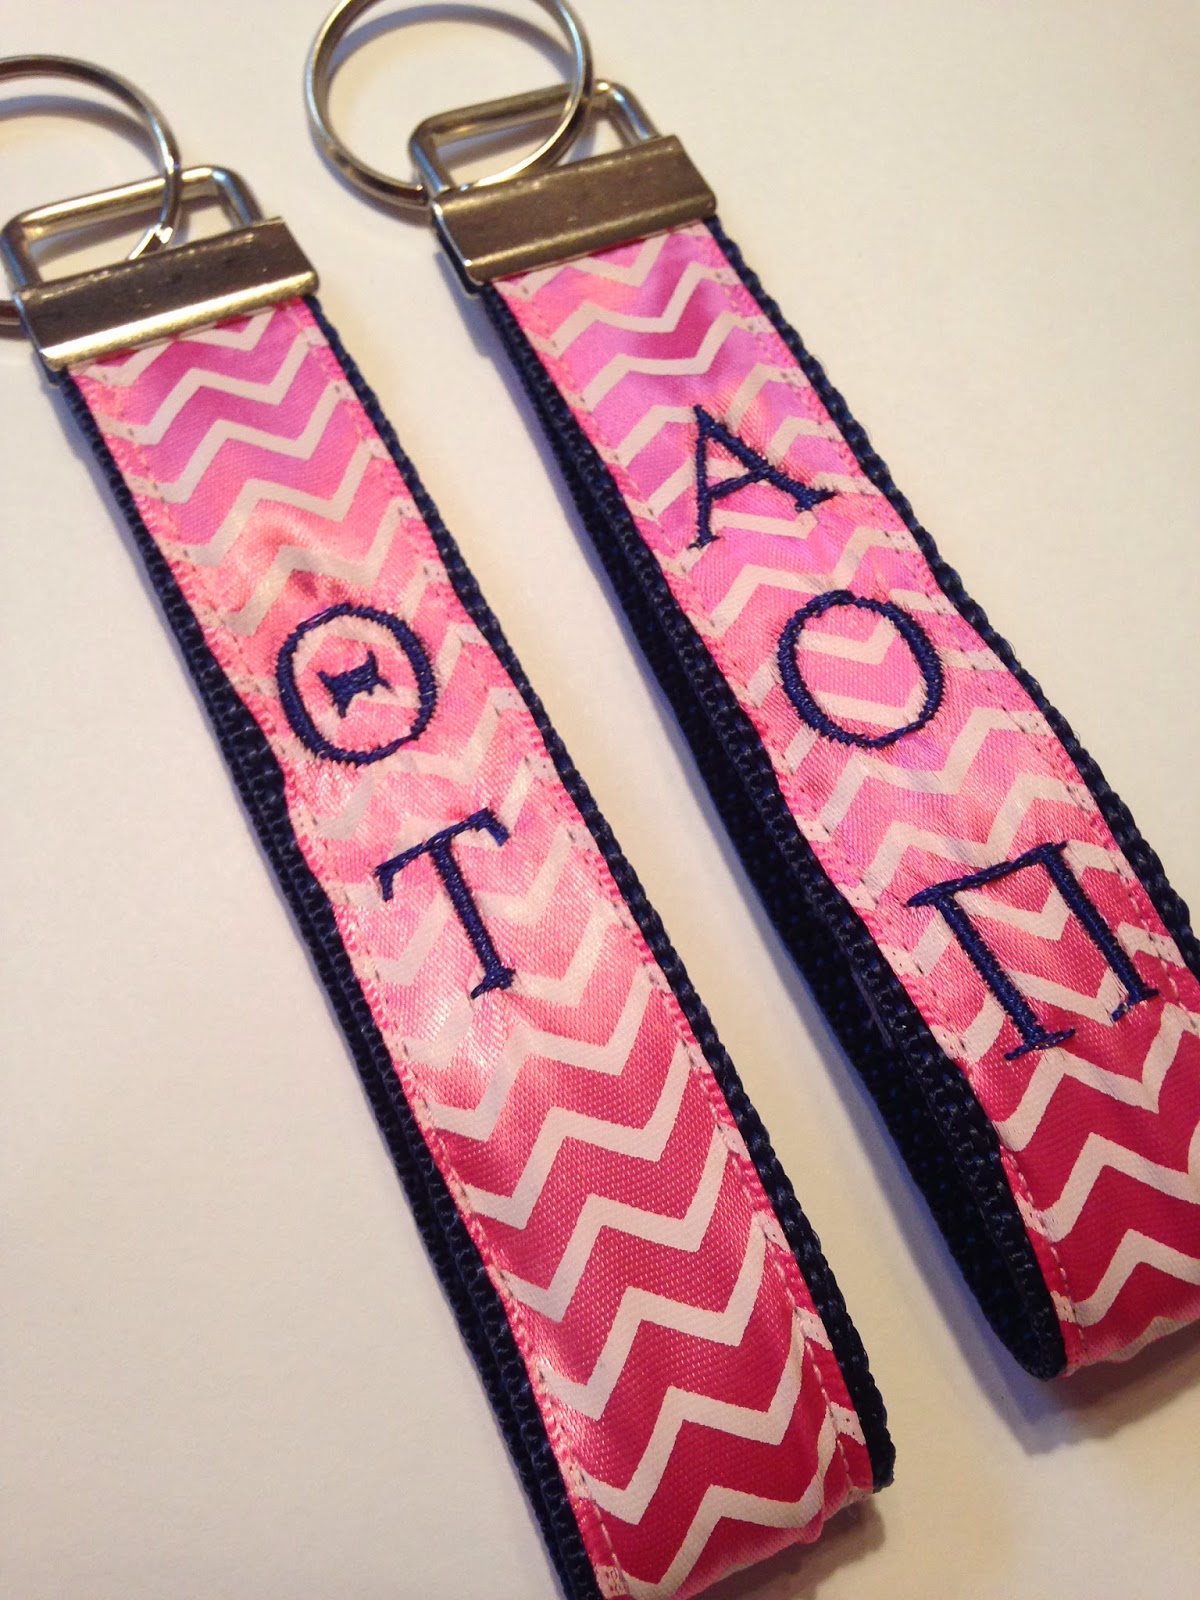
Today was a great day!  Wanna know why?  Because I finally got all of the supplies I needed to make these adorable Key Chain Wristlets!  I found my inspiration from Prudent Baby a while ago and loved the idea!  About a week ago I got around to ordering some sets of the hardware.  10 sets on Amazon.com for $4.25!  They came in the mail on Friday :)  Then today I went to Walmart to get some cotton webbing and pretty ribbon.  After finding plenty of those items and much more... I got to sewing!

So there are my first two!  I have enough supplies to make 10, so expect to see more in the near future!

Here is how you can make one for yourself!
Step 1. Get the materials: 1 set 1" key fob hardware (includes the clamp and the ring), 10 inches of colorful 1" wide cotton webbing, 10 inches of pretty ribbon (less than 1" wide)

Step 2. Sew the ribbon down the middle of the webbing.  This isn't too difficult if you use your pins and go relatively slowly, making sure you are staying in the middle the whole time.

Step 3. Fold the now beautified webbing in half (with the ribbon facing outwards) and trim the ends so they are even.

Step 4. Insert the ends into the clamp and use pliers to squeeze it shut.  Hint: Make sure your pliers are smooth or you make them smooth with duck tape so as not to damage your clamp.

Step 5. Add the key ring and that is it!  Super easy, super cute, and super useful!  
Gotta love it!  If you love them too, buy them! Here :)

Below are most of the supplies you need, can't get much easier right?


More Updates!  These are the some of the many combinations you can make!  Find them here on Etsy!


 See how many options there are to choose from?!?! Crazy right?
Webbing Options:

Ribbon Options:


Check out my store, Precious Prep, here, on Etsy.com!


Have a Kraftie day!

Don't forget to check out the separate listing for Greek letter keychains too!


Wednesday, April 16, 2014

Embroidered Pocket Tee Tutorial

Also known as a 'frocket' the pocket tee is a wardrobe essential on any college campus! Learn how to make your own here!

Onto the fun stuff!  If you are a preppy girl or a sorority girl then you probably love a good 'frocket', like me (btw I am preppy, not sorority)!  In this tutorial you will see not only how to add a cute pocket but how to embroider it for even more cuteness!


First things first:
Draw out a pocket pattern.  Doesn't have to be perfect (you know how perfection goes over on this blog!) just make a general pocket shape that is about 4" by 5".  Make sure to leave the little flaps as shown in the picture.

**Update! Click here for a printable version!  All you have to do is print and cut!
Copy and paste this link to share the pattern with friends! https://drive.google.com/file/d/0Bw1R1Y2V5RzkamhwLW51cmJJUW8/edit?usp=sharing


Next cut out a rectangle of fabric that is bigger than your pattern.  Place onto your embroider hoop, in between your tear away stabilizer and water soluble stabilizer(if you're using a knit fabric like I did (which for beginners I suggest you do NOT use knit! It is hard to work with)).


Embroider what ever your heart desires on there!  In this case I was making one for a friend so I just did her initial, but a monogram would also be adorable!  Maybe I'll do one of those real soon!


 Cut out the fabric using your pattern.  Make sure your embroidery is going to end up in the center of where you cut :)

Fold (or even better iron) in the flaps.  Sew a straight stitch across the top of the pocket.  Then pin onto the shirt (I used a LOT of pins) in the correct placement.  Finally carefully sew around the pocket (***leaving the top open***) as close to the edge as you can.

Thats it!

As always leave me questions and comments below!  Follow me on Instagram for daily preppy/crafty/fun pics (@kraftiekatie)

Enjoy your new shirt!


Sunday, April 13, 2014

{How To} Accessorize for Less

This post is not about crafts per-se... however through Pinterest, Instagram, and this blog I have learned that a lot of my fellow crafters are like me!  And I LOVE a good deal - hey the more money I save, the more I can spend on fabric ;)

So hopefully you will enjoy learning how to find an AMAZE-FEST USA deal on... wait for it .... EBAY!

There are SO many great things to find on eBay that are brand new - not used items.  And for cheap!  Like really cheap.  Let me explain:

So many good deals! Where to begin?!?

Ok I'll start here: So we all love Michael Kors Watches, am I right?  However we all do not love the price tag.  One of my biggest pet peeves is people not doing their research when making a purchase.  You can go to the mall or even Amazon and find a 'boyfriend' watch for around $30.  Which compared to over $200 seems like a great deal!  But!  If you just do a little looking around on the internet you'll find these (and more!) for $5.39 + free shipping.  Yes you can thank me later ;)  All links will be below the pictures.


Ok so now that I have your attention, on to the next one!  I really want to make one of these:
But they want $37 plus shipping for one of those things!  So I know not everyone can embroider their own stuff but there are embroidery shops that will embroider for you.  Anyways I am going to (try to) embroider this on my own and I got my clutch for [drumroll please] $2.99!  This was a bid item but you can search on ebay and easily find more for sale!

Here is how mine looked after embroidery:


I found this amazing shop on Etsy, and I think you all should check it out because it is a really great deal and product!  

However, being the deal-seaker that I am I had to try and find an even lower price.  I haven't gotten these items yet so I can not vouch 100% for their quality but it is a good deal :)  I got 10 tassels and the bracelet for $7 total!

Tassels - $6
Bracelet - $0.99

Now if you are like my mom, you think these are hideous... but if you are like me you think they are on trend and the perfect statement necklace.  Statement necklaces can be SO expensive!  And here these are for just $4.32!  So yes I got 2 :) haha


 Another popular statement necklace is the bubble necklace!  Get this one for just $4.25!

How cute is this bag?  It is kind of nautical which is why I LOVE it!  And for only $8.50 I REALLY love it!

Now, I'll admit, these are significantly different than the inspiration: which is the Lilly Pulitzer bow belt:

But as much as I love LP, $48 is WAY too much for a skinny little belt! In my opinion of course :)  So here is my alternative which is, although different, still extremely cute!  And how much cuter is it when you know you only paid $1.58 for it?!?!


Well holy smokes that was a long post! BUT I hope you enjoyed and that you are headed to eBay to find some deals of your own!  PLEASE share what you find!!  Tag me in your Instagram pics of deals :)

xoxo Katie


Tuesday, March 18, 2014

{How To} - Fabric Storage

I have been wanting to share this post with you for so long now and I finally got the chance to take pictures of what I've got going on in my craft room.  Now I will admit that I don't have the best system BY FAR!  But it is a system none the less and it works for me.  Hope you enjoy!

Today I am going to share with you all how I store my fabric!  And I hope you won't judge me by the amount of fabric that I have... you won't right? :)


I love love LOVE fabric remnants.  You'll see below that I am not kidding.  I should probably be in the Guinness Book of World Records for most fabric remnants.  Please let me know if you have a ton too so I don't feel like a crazy woman!  (Though this feeling apparently doesn't stop me from buying more fabric remnants...)  I think what attracts me to them is that I can get really pretty fabrics for a cheap price since you usually get less than a yard in there.  Many of the things I make are small items (check out my Etsy shop!) that don't need much fabric, so remnants allow for a lot of variety for me.  Plus you can buy like 10 of them and not feel guilty for spending a ton of money on fabric you don't need.

Ok fine, on to the picture.  Here you go:

{So pretty!  How could I have resisted any of these?!}

Welcome to FHA (fabric hoarders anonymous)  Hi, I'm Katie and I am a fabric hoarder.  I seriously need this shirt:


 Like I said before... please tell me someone else shares the remnant obsession!!

Onto the actual point of this post...

As you can see I use one of those hanging shoe storage things for my remnants!  I picked this one out because it has clear pockets for ultimate visibility!  It is absolutely perfect because I can easily see what I have when I want to and at all other times it is behind the door so no one else can see!  Plus this method of storage easily keeps me in check: no more remnants for me until there is an open spot!  And I can justify having all these because they aren't in the way AT ALL!


My next storage area is not as easy to hide... it is a mini bookshelf.  I have all my other fabric stacked up over here.  Not quite as easy to get to but I can still see what I have relatively easily and since it isn't super organized I can just throw a piece back on top of a pile when I'm done.


On to another tangent - can we just all agree that those uber-organized things you see on Pinterest are not realistic?  I mean initially they are great and pretty but once you have to actually use them it is way to much effort to keep them that way!  Maybe thats just me... let me know what you think in the comments.

Finally I will admit that I have yet another area I keep fabric.  I forgot to take a picture - in fact I forgot about it completely until just now.  But under the bed in my craft room is one of those long plastic boxes that are meant for under the bed storage.  This box is filled with random fabrics, a kind of project graveyard that I will hopefully get to someday.  So I never really use anything out of there day to day, but alas, it is there.

So how do you store your fabric?  I am hoping to revamp the bookshelf portion of my storage someday... so give me ideas!!

Check out the buttons over there for more Kraftie Katie ----->
Have a great week!


Tuesday, March 4, 2014

Fabric Hair Bow Tutorial

I opened up a shop on Storenvy!  I still have my Etsy shop of course but the Storenvy shop is all about hair bows!!  Bows range from $3-$5 and you can add-on to any bow with a monogram, greek letters, school letters, and/or an anchor charm!


Onto the important stuff - the tutorial!

Step 1:
Cut a piece of fabric 5" by 8".  I like to pick small p


rint fabrics for bows but larger prints can work too. A plain bow never fails either!
Also cut a small piece of fabric for the center of your bow.  I don't have exact measurements for this... you know me and how I love to keep things simple!  I would guess about an inch by 2 inches, cut more to be safe!

Step 2:
Fold the large piece of fabric in half, right sides together.  So you should have a piece 5" by 4" now.  Sew along the 3 edges, leaving a turning hole in the center of the bottom.

Step 3:
Clip corners and turn

Step 4:
Fold the fabric accordion style and sew right in the middle to help it keep its shape.

Step 5:
Take the small piece of fabric and fold in each long edge then fold it in half and sew along the open side.

Step 6:
Measure around the sewn center of the bow and cut, leaving a small seam allowance.

Step 7:
Sew the center strip's ends together, turn and slide onto bow

Step 8:
Attach a hair clip and make a bunch!

Don't forget to stop by my new store!

xoxo,
Katie
Find these on Etsy!


Sunday, February 23, 2014

How I Organize Documents for my Etsy Shop

I am SO grateful for the success I have had with my Etsy shop, Precious Prep.  While to some it may seem like nothing, to me it is amazing and I love that other people love my products and want to buy them!  So with success also comes work, and there is a lot more work than you would think!  If you are a fellow Etsy (or any business) owner you know what I am talking about!

So if you are just getting started, here is how I organize my documents!  Hope you find it helpful!


I try to keep everything in one place so I don't lose anything.  On the right side of this folder I keep the receipts from anything I buy online.  So anything from eBay or Amazon pretty much.


On the left side are the receipts from stores when I buy supplies or material in the green paper clip.  In the pink paper clip are all my receipts from the post office.  I recently started buying my shipping labels online so those will be stored in my Etsy account for my reference. 


Finally is just a fun item, I started keeping track of where I get orders from.  I just color in every state whenever I get an order.  Actually I've colored in a few more since I took this picture!  So exciting to see the map getting filled in!


I know it isn't much but I hope you all find it helpful and useful!  Please comment below if you want to see more posts about running an Etsy store!  And don't forget to check out my shop :)


Wednesday, February 19, 2014

DIY Monogram Chevron Binder Covers

Check out my new blog: Sugar Spice and Sparkle!


There are two things I love in life: monograms and chevron.  Okay so maybe I love way more than that but for the purposes of this post lets pretend those are the two main things ;)

So here we have a great DIY that combines those two and brings them into your everyday life!

Binder covers!!  I know school can be a bit... drab, but these binder covers will brighten up each and every class!

Just a few easy steps and you'll be ready to print out and use your new beauties by the next school day. Not in school anymore?  These are also perfect for family documents and organization binders!

The first step is to go back here and read my "How to Chevron" tutorial.  All you need is Microsoft Word (and maybe a little patience, lol)

Next add a circle (or oval, or square, or rectangle... whatever floats your boat) anywhere on the page.  I like mine in the center towards the top.  Maybe you like yours dead center or in the bottom left corner (why?).  You get the point - somewhere on the page.  Format the shape to be white with a black line.

Click on this:

To get this:


Third you'll need 3 text boxes inside your shape.  The center one will use a larger font size than the other two.
Now click on this:

If you don't like any of the Microsoft Word fonts that are cursive looking, just Google or go on Pinterest and search for a monogram font.  Click here to see a great board of free fonts ;)

Now use the font you love and type one letter of your monogram into each of the text boxes.  Position them accordingly and you are all done!  Print that baby out and put her on a binder or notebook.


Having a hard time making it look right?  Don't have the time for all this?  Head over to Precious Prep and I'll make one for you!  Actually I'll make 8 for you!  Check it out here.

Don't forget to follow me on Instagram, Twitter, Pinterest, etc.  Use the buttons to the right :)

Let me know if you have questions and how yours turn out!
~Katie


Wednesday, February 12, 2014

DIY Headband Tutorial (Super Easy!)


Follow me on Instagram

I've seen several cute headbands, like these I am about to show, on Pinterest.  But none of them (that I have seen) have tutorials!  So here is my (very detailed) tutorial for making these super quick and easy headbands!  Don't be discouraged by the length of this tutorial, these come together really quickly!  I just wanted to be super detailed in my tutorial.

These headbands are now available for order in my etsy shop, PreciousPrep! (New colors just added!)

Step 1:
Cut two long strips of stretchy knit fabric 6" by 22" each (approx. if you have a really big or small head you may need to adjust the length, I think my head is normal to big... haha)


Step 2:
Fold each piece along the long side with right sides together and sew all the way up.  Again no real need to be precise, and even if I tried to be precise I failed because stretchy fabric is tough to sew with!!


Step 3:
Turn each tube inside out.


Step 4:
Lay the pieces in a '+' shape.  Make sure the seams are in the middle, facing up for the bottom piece and facing down for the top piece.


Step 5:
Fold over the bottom piece (you shouldn't be able to see this piece's seam now)


Step 6:
Fold the top piece in half (again now you shouldn't see that piece's seam)


Step 7:
Bring all 4 ends together and sew across.  This is kind of tricky to get all these slippery strips together, but as usual - precision isn't super necessary!  Love projects where you don't have to be perfect!


Step 8:
Cut off a little of the excess and trim the corners so they don't show as much.


Step 9:
Try it on!  Sooooo comfy!


Step 10:
Make a bunch!  I plan to buy some more fabric and make even more for different gym outfits!


Well what do you think? Hope you enjoy yours as much as I am already enjoying mine!
